Monday, March 30, 2020

Magic Milk

Magic Milk Science Experiment


This is a simple chemistry experiment that is always fun to do. The results are unique each time and always produce cool and pretty results.


Materials: 

  • Full Fat Milk (you can also try it with milk of other %s, to see if they produce different results)
  • Cotton Swabs/Q-Tips
  • Dawn Dish soap
  • Food Coloring
  • Baking Dish or a Shallow Bowl
  • Small Bowl


Instructions:
Start by pouring the milk into the baking dish. You just need enough to cover the bottom of the pan.

Next add drops of food coloring randomly over the milk. Spread them out and use different colors.

Fill a bowl with a little dish soap. Dip your cotton swab in the dish soap.

Now gently touch the cotton swab to the milk and watch what happens.

The milk is made of proteins and fats. When the dish soap is added those soap molecules move around and try to attach to the milk molecules creating crazy cool patterns and swirls.

Dump out the milk and start again. Does different kinds of milk respond differently?


Thursday, March 19, 2020

Build an Aircraft

With the long days at home, you have plenty of opportunity to give your kids building challenges that can happen over a few days. A great way to use up stuff you've got in the house is upcycling-- using recycled items to create something new. So over the course of the weeks, fill a box with things that can live in a new way. This project benefits greatly from upcycled items. :)

We'll share several ideas over the coming days, but here's the first to get you started...


Build an Aircraft!

Materials:

  • A variety of random supplies (straws, cardboard, paper tubes, deli and food containers, egg cartons, bottles, wooden things (toothpicks, skewers, popsicle sticks, decorating things, etc), clay, paperclips, etc.
  • Tape, glue and hot glue (if an adult can help)
  • Books, magazines, or the internet for inspiration

Instructions:

Give your inventors a bunch of supplies and some time and space.  You could build a helicopter, glider, airplane or other aircraft. Perhaps it's best to invent a new type of aircraft. 

Build for a while, then take a break. Come back to the design and make adjustments and refinements.  Change the materials, rebuild the wings, figure out how to make the rotors move, etc. The sky (literally) is the limit.

Image result for kids cardboard airplane

Image result for kids cardboard helicopter

Dancing Raisins

This is a fun experiment to learn about density and the influence of carbon dioxide on naturally denser things.

Materials:

  • A tall glass cup or jar
  • A can of colorless soda (like Sierra Mist or 7Up)
  • A handful of raisins 

Directions:
    Image result for dancing raisin
  • Pour the soda into the glass or jar. You will see bubbles coming up from the bottom. Those are carbon dioxide bubbles released by the liquid (they were put there to make the soda bubbly)
  • Drop 8-10 raisins in the container. Watch what happens. Do they drop to the bottom immediately? Then what happens?
  • You can try this experiment with other things in the house, to see if you get different results.
What happens:  Initially, the density of the raisins is higher than the liquid they are placed in. So they sink right away. But the bumpy skin of the raisin is the perfect place for some of those tiny air bubbles of carbon dioxide to cling to the raisin. When enough of them collect on the outside of the raisin, the bubbles carry the raisin to the top. The bubbles then pop and escape into the air on the surface, and the raisin will drop to the bottom again. This happens over and over until the soda goes flat and there are not enough bubbles to carry the raisin up again. 

Acids & Bases in Your House


This is an oldie but a goodie. Very low-tech, but a great way to make discoveries about things you find in your home.

In this experiment, you create a solution that will help you test for the acidity of an item.

acids and bases pH scaleAcidic solutions are ones that have a high concentration of hydrogen (H+) ions. These hydrogen atoms have lost an electron and now only have a proton, giving them a positive electrical charge. Solutions that are basic contain hydroxide (OH-) ions. When the two combine, you can get a pretty cool reaction. For that experiment, check out the volcano posting elsewhere on this site.

The pH scale is the way that the acidity of a solution can be measured. Acids have a pH below ,and basics have a pH above it. Something that is neither acidic or basic is distilled water-- which has a pH of 7, and an equal number of H+ and OH- ions. 

Instead of using fancy litmus papers to test the acidity or basicness of a solution, you can make your own indicator at home. Simple and fun!

Materials:

1/2 a head of purple or red cabbage, chopped roughly
1 gallon of water
A large pot (like for spaghetti)
An adult who can use the stove
Coffee filters or a big slotted spoon
A large pitcher
Small clear glass bowls or cups
A variety of household items for testing (see suggestions below)


Directions:
In the pot, combine the chopped cabbage and water. Bring to a boil on the stove and simmer for 10-15 minutes. Remove from the heat and allow to cool. Using coffee filters or a big slotted spoon, remove all the cabbage pieces from the water. Transfer the cooled blue/purple water to a pitcher.

Get your household items arranged for testing.

Line up a few small glass bowls, cups or jars. Put about 1/4 a cup of the purple indicator water in each container.

Start with something like lemon juice. Add 2 tablespoons of lemon juice into the first container with purple water. What happens? Lemon is acidic, so it should turn the liquid red.

Then try some kitchen soap. Put a few squirts in the next container, and stir gently. What color does it become? Kitchen soap is basic, so the liquid should turn green.

Repeat with a variety of other things in your house. What colors are you getting? Containers that turn pinks and reds contain acidic substances. Containers that turn blue, green and yellow indicate basic substances in the mix. See what colors you can discover!


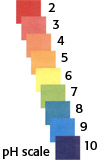
Red Cabbage pH Indicator Colors (2= highly acidic, 12= highly basic)

pH         2         4               6           8                10                   12
Color   red    purple    violet     blue       blue-green    green-yellow

Image result for purple cabbage ph experiment

Suggested things to test:
-lemon juice
-milk,
-amonia
-baking soda
-vinegar
-antacids (like Tums or Pepto Bismol)
-mouth wash
-seltzer water
-egg white
-soda
-iced tea
-kitchen soap
-laundry soap
-hydrogen peroxide
-ask a parent to help you find other things to try!

Wednesday, March 18, 2020

STEM activities for toddlers

In Kindergarten, we have students participate in centers during their 50-minute STEM class, which keeps them engaged and active during short spurts of activity. Some of the centers we usually do include: Keva Planks, LEGOS, time on a computer using CodeSpark, and marble mazes. Building the basics of STEM-- including the engineering mindset-- helps build students' creativity and engagement with their lessons. The more hands-on the projects are, the better!

For little kids, I'd recommend making a variety of activities that they can do for 10-15 minutes, and then do something different or rotate through.

Here are some general recommendations on activities for toddlers that tie to STEM:

Simple Building Projects. Build a tower. Build a house. Build something in a circle. What about something that leans? Building can be done with blocks you already have, or with "upcycled" items in your recycling bin. Egg cartons, milk containers, yogurt tubs, paper towel rolls.

Build Ramps! See what cars go fast, and what go slow. Do all things roll down ramps? What about square blocks? Ramps can be made of anything-- a cookie sheet, a piece of cardboard, books, a mattress, etc. What can we use as a ramp?

What Happens in Water? Water is always something fun to play with for kids, and you can add some educational elements to simple water play, if your kids seem ready. Does a yogurt container float or sink? If you fill it with water, what happens?  Does a ping pong ball sink? How about a golf ball? Unboiled eggs float-- do boiled ones do too? Filling and dumping helps with children's dexterity and coordination and you could potentially get a 20 minute phone call in (while supervising the water play, of course).

Nature!  Take a walk in the neighborhood. Look for signs of spring. Birds tweeting, small flowers and plants emerging from the dirt, trees getting leafy. Look for bugs, feel the dirt, maybe even plant some seeds outside or in pots inside and watch them grow.

Simple Science. Young kids will get a big kick out of the surprise and excitement of some simple reactions you can make at home. Diet Coke + Mentos create an impressive geyser of soda (do it outside). Baking soda + vinegar makes an exciting volcano of fizz. Create a lava lamp or do a magic milk experiment (both coming as main posts).

Image result for cardboard ramp toddler

Labyrinth Game

There are lots of creative labyrinths in the world-- check out some of the examples below.

Your kids can create their own labyrinth games with a couple simple supplies and some creativity. Have each person make a game, and then challenge others to complete them!

Supplies:
  • A shallow box for each person (a small pizza box with a lid would be perfect)
  • An exact-o knife (and an adult to use it)
  • Glue (hot glue gun works the best
  • Craft or popsicle sticks (but you could use other things too, like strips of cardboard, pieces of dry fettuccini, wooden skewers, straws, etc.)
  • Paint, markers, or crayons
  • A pencil
  • A coin
  • A marble or similar ball slightly smaller than the coin 

Directions:
Have an adult help figure out if the bottom of the box fits inside the top of the box, so that you end up with a little floating floor within the box. 

Then, using a hot glue gun if you have it, begin creating a labyrinth course in the box. Basically, you're creating a 3-D maze. 

Once you've created the maze, for extra challenge, use a coin to trace holes in various spots along the track, and have an adult cut out the circles with an exact-o knife. Paint and decorate the box and maze. 

Then, challenge friends and family to complete your labyrinth puzzle without letting the ball fall in the holes along the track!


RESOURCES: 

Image result for labyrinth puzzle kids diy

Build a Spider Web

This activity takes few resources, but be prepared to perhaps run out of dental floss when it's over!

Working in pairs, give each group a container of dental floss and challenge them to create a realistic spider web. Can they do it with the dental floss in one piece, and no tape? Scissors and knots will definitely make it easier. Knots and loops could help build the structure.

Either before or after, use the opportunity to discuss spider webs, look for some around you, and learn how they're created.

Some resources below could help guide your conversation!

Curious Kids: What are spider webs made of?
Kiddle Encyclopedia
The School Run
BBC Earth

Image result for dental floss spider web

Tall Tall Tower

This could be a fun activity for you to do as a family (parents/guardians and big siblings can be challenged too) or younger kids can work on this while parents get some work done. Another activity where we recommend using a kitchen timer. Some kids will work quickly and be 'done' long before the timer is done-- so challenge them to go back and keep working!

Who can build the tallest tower using the supplies provided?

We recommend you put out a variety of items-- toilet paper tubes, sheets of paper (a great use for paper headed to the recycling bin), straws, corks, tape, paper clips, magazines, etc. Whatever you have around.

Distribute supplies, set a timer, and see who can build the tallest tower in 30 minutes. Sounds easy, but it's often not.

Variations can include limiting supplies (only 10 sheets of paper and paperclips?), or having kids work in teams. Will rolling paper in a tube cause it to be stronger and thus grow taller? It's fun to experiment and try new things. Tallest tower 'wins'!

Image result for paper tower

Crystal Ornaments

You might think that crystal ornaments are just for the holiday season, but let's be honest... science can happen anytime. You can make crystal ornaments with a variety of different solutions, so you should be able to do it at home without having to get anything new.

Making a crystal formation is pretty simple-- you need to make a super-saturated solution of dissolved material, and as the liquid cools, the crystals form again and adhere themselves to whatever is dangled in the solution.  If you have pipe cleaners, that works great. But some string will do (even dental floss) if you need it. Supplies are simple, but ask your parent or big sibling to help make the solution with hot water!

Ingredients:

  • Hot water (boiling, ideally)
  • A glass cup or jar
  • A spoon
  • A piece of string, a pipe cleaner, dental floss, etc.
  • A pencil
  • A medium to make the solution (white sugar, table salt or borax powder)
Directions:
  • Ask an adult to boil some hot water. You should have enough to fill the glasses or jars  you plan to use. 
  • Carefully fill the cup or jar until almost full. Then add spoonfulls of the medium you have chosen (salt, sugar or borax powder) and stir after each addition. It should dissolve each time, but once you've made a super-saturated solution, it will stop dissolving. It means you've added enough that it cannot dissolve any more. 
  • If you're using a pipe cleaner, create a shape that will fit in the cup or jar. Tie it with string and attach the other side of the string to a pencil. Carefully lower it into the glass, using the pencil to hold it up across the jar. You don't want the string or shape to touch the sides or bottom!
  • Put the jar in a safe spot and allow it to cool completely over night (and for 2 days). When there are crystals formed on the string or shape, carefully remove it from the solution! You've made crystals!
Image result for crystal ornaments scienceImage result for crystal ornaments science

Rube Goldberg Machines


Have you ever heard of Rube Goldberg? Well he was a creative guy who lived from 1883 to 1970. He was a cartoonist, inventor and (fun fact) is the only person to be listed in the dictionary as an adjective! And now his legacy lives on with a kind of machine named after him.  A Rube Goldberg Machine is a contraption that uses a chain reaction to complete a task. It makes something very simple (putting a ball in a basket) very complicated, by using chain reactions.

You can sometimes get Rube Goldberg kits, but it's just as easy to make up a Rube Goldberg machine at home. What could you do? Get a ball to roll off the table, bounce off a tennis racket and land in a garbage can? Creativity is king here.

Here are some links for inspiration.

https://www.youtube.com/watch?v=MgDF1tyoOvU

https://www.youtube.com/watch?v=WiHn5_RfKjE

Online Resources

For the times when parents have to work, here are some great online and app programs you can use with your kids. Many of these are things we use frequently here in Cherry Creek School District, so your kids may be familiar with them!


  1. SCRATCH- https://scratch.mit.edu/    (online coding program where you can make your own animations, stories and games. Good for K-5)
  2. Code.org- https://code.org/  (online coding program with a huge variety of games and activities. Good for all ages)
  3. Interland- https://beinternetawesome.withgoogle.com/en_us/interland (online game about digital citizenship. Good for all ages)
  4. TinkerCad- https://www.tinkercad.com/ (easy to use 3D design, electronics and coding program. Good for 1-5)
  5. BrainPop- https://www.brainpop.com/ (a full website of short videos to keep minds interested and active. Good for all ages)
  6. ClubSciKidz- http://www.clubscikidzmd.com/blog/ (a website offering daily activities, recipes, etc.
More to come!

Image result for students ipads

OOBLECK

Oobleck is a crazy cool mixture that is both a liquid and a solid. which means it is a non-Newtonian solution. Changes in pressure to the mixture (like pushing on it with one finger versus holding it) can change the properties of the solution. Give it a try and see what you think.

Ingredients:

  • 2 Cups of Cornstarch
  • 1 Cup of Water
  • food coloring (optional)
  • a bowl and spoon for mixing
Directions:

Combine cornstarch and water in a bowl and mix well. Add food coloring if you'd like. 

Play with the Oobleck. Push a spoon on the mixture and notice how it gets hard. Then pick it up with your hands and notice how it gets melty soft. 

Did you know that Oobleck got its name from a Dr. Seuss book? In the book, Oobleck, a gooey green substance fell from the sky and wrecked havoc on the kingdom. If you're able, read the book as a family and then make Oobleck yourself! 

Image result for oobleck

Cotton Ball Catapult

Catapults are a great way to learn about force and motion, in addition to general engineering and design. Most families have cotton balls at home, but if you can't find any, a bunched up piece of tissue or paper will work. Again, our activities are designed to stretch your creativity. So if you don't have a ball, make a ball! If you don't have popsicle sticks, look around the house to find something else that could work. Design a new one each day-- to see what works the best.

A catapult is a simple machine that stores energy and then releases it quickly to cause motion. Check out this YouTube video to get some inspiration and make your own! LINK

When everyone is done building, have a competition to see who can launch the ball the farthest!

Supplies:

  • Cotton balls (or anything you can create to be a ball)
  • Plastic spoon
  • Rubber bands
  • Popsicle sticks or something similar
  • Tape or glue
  • Any kind of materials that might help your design-- plastic cups, markers, etc. 

Image result for cotton ball catapult  Image result for cotton ball catapult

LEGO Challenges

LEGOS are a great way to use your imagination and create prototypes and designs of things you can dream up! 

In my classes, I put out a challenge card next to a bin of assorted LEGOS. If you have multiple kids (parents can play too) in your house, put out several piles of LEGOS and a different card/challenge for each. Give them 10 minutes to begin building their challenge. Set a kitchen timer and work fast. When the timer goes off, everyone rotates one spot and begins working on the challenge someone else was doing. You can't take apart any of what's built-- you have to add on! Keep going until everyone is back to their original project.

  • Build a robot
  • Build a car
  • Build an ice cream cone
  • Build a box with a lid
  • Build a person with moving arms and legs
  • Build your favorite character
  • Build a building that opens
  • Build a bridge to hold something heavy
  • Build an animal
  • Build something you would find in a kitchen
  • Build something that starts with a "C"
Image result for lego building kids

Welcome!

Welcome to STEM at Home, brought to you by some STEM teachers from Cherry Creek Schools.

During this time when schools are closed, we thought we could put together a variety of fun activities for students and their families to do at home, to keep STEM skills sharp. We will share here all sorts of things-- projects you can do at home with limited supplies (most of which you might already have in the house), some websites where you can continue working on STEM skills you've been doing in school, and other fun activities. Our hope is that you can do these things without needing to leave the house (but you might want to go outside for some of the experiments!).

We'll keep posting new activities, ideas and information, so come back to check out the new stuff often.

Stay safe and enjoy working as a family on some of these awesome STEM activities!